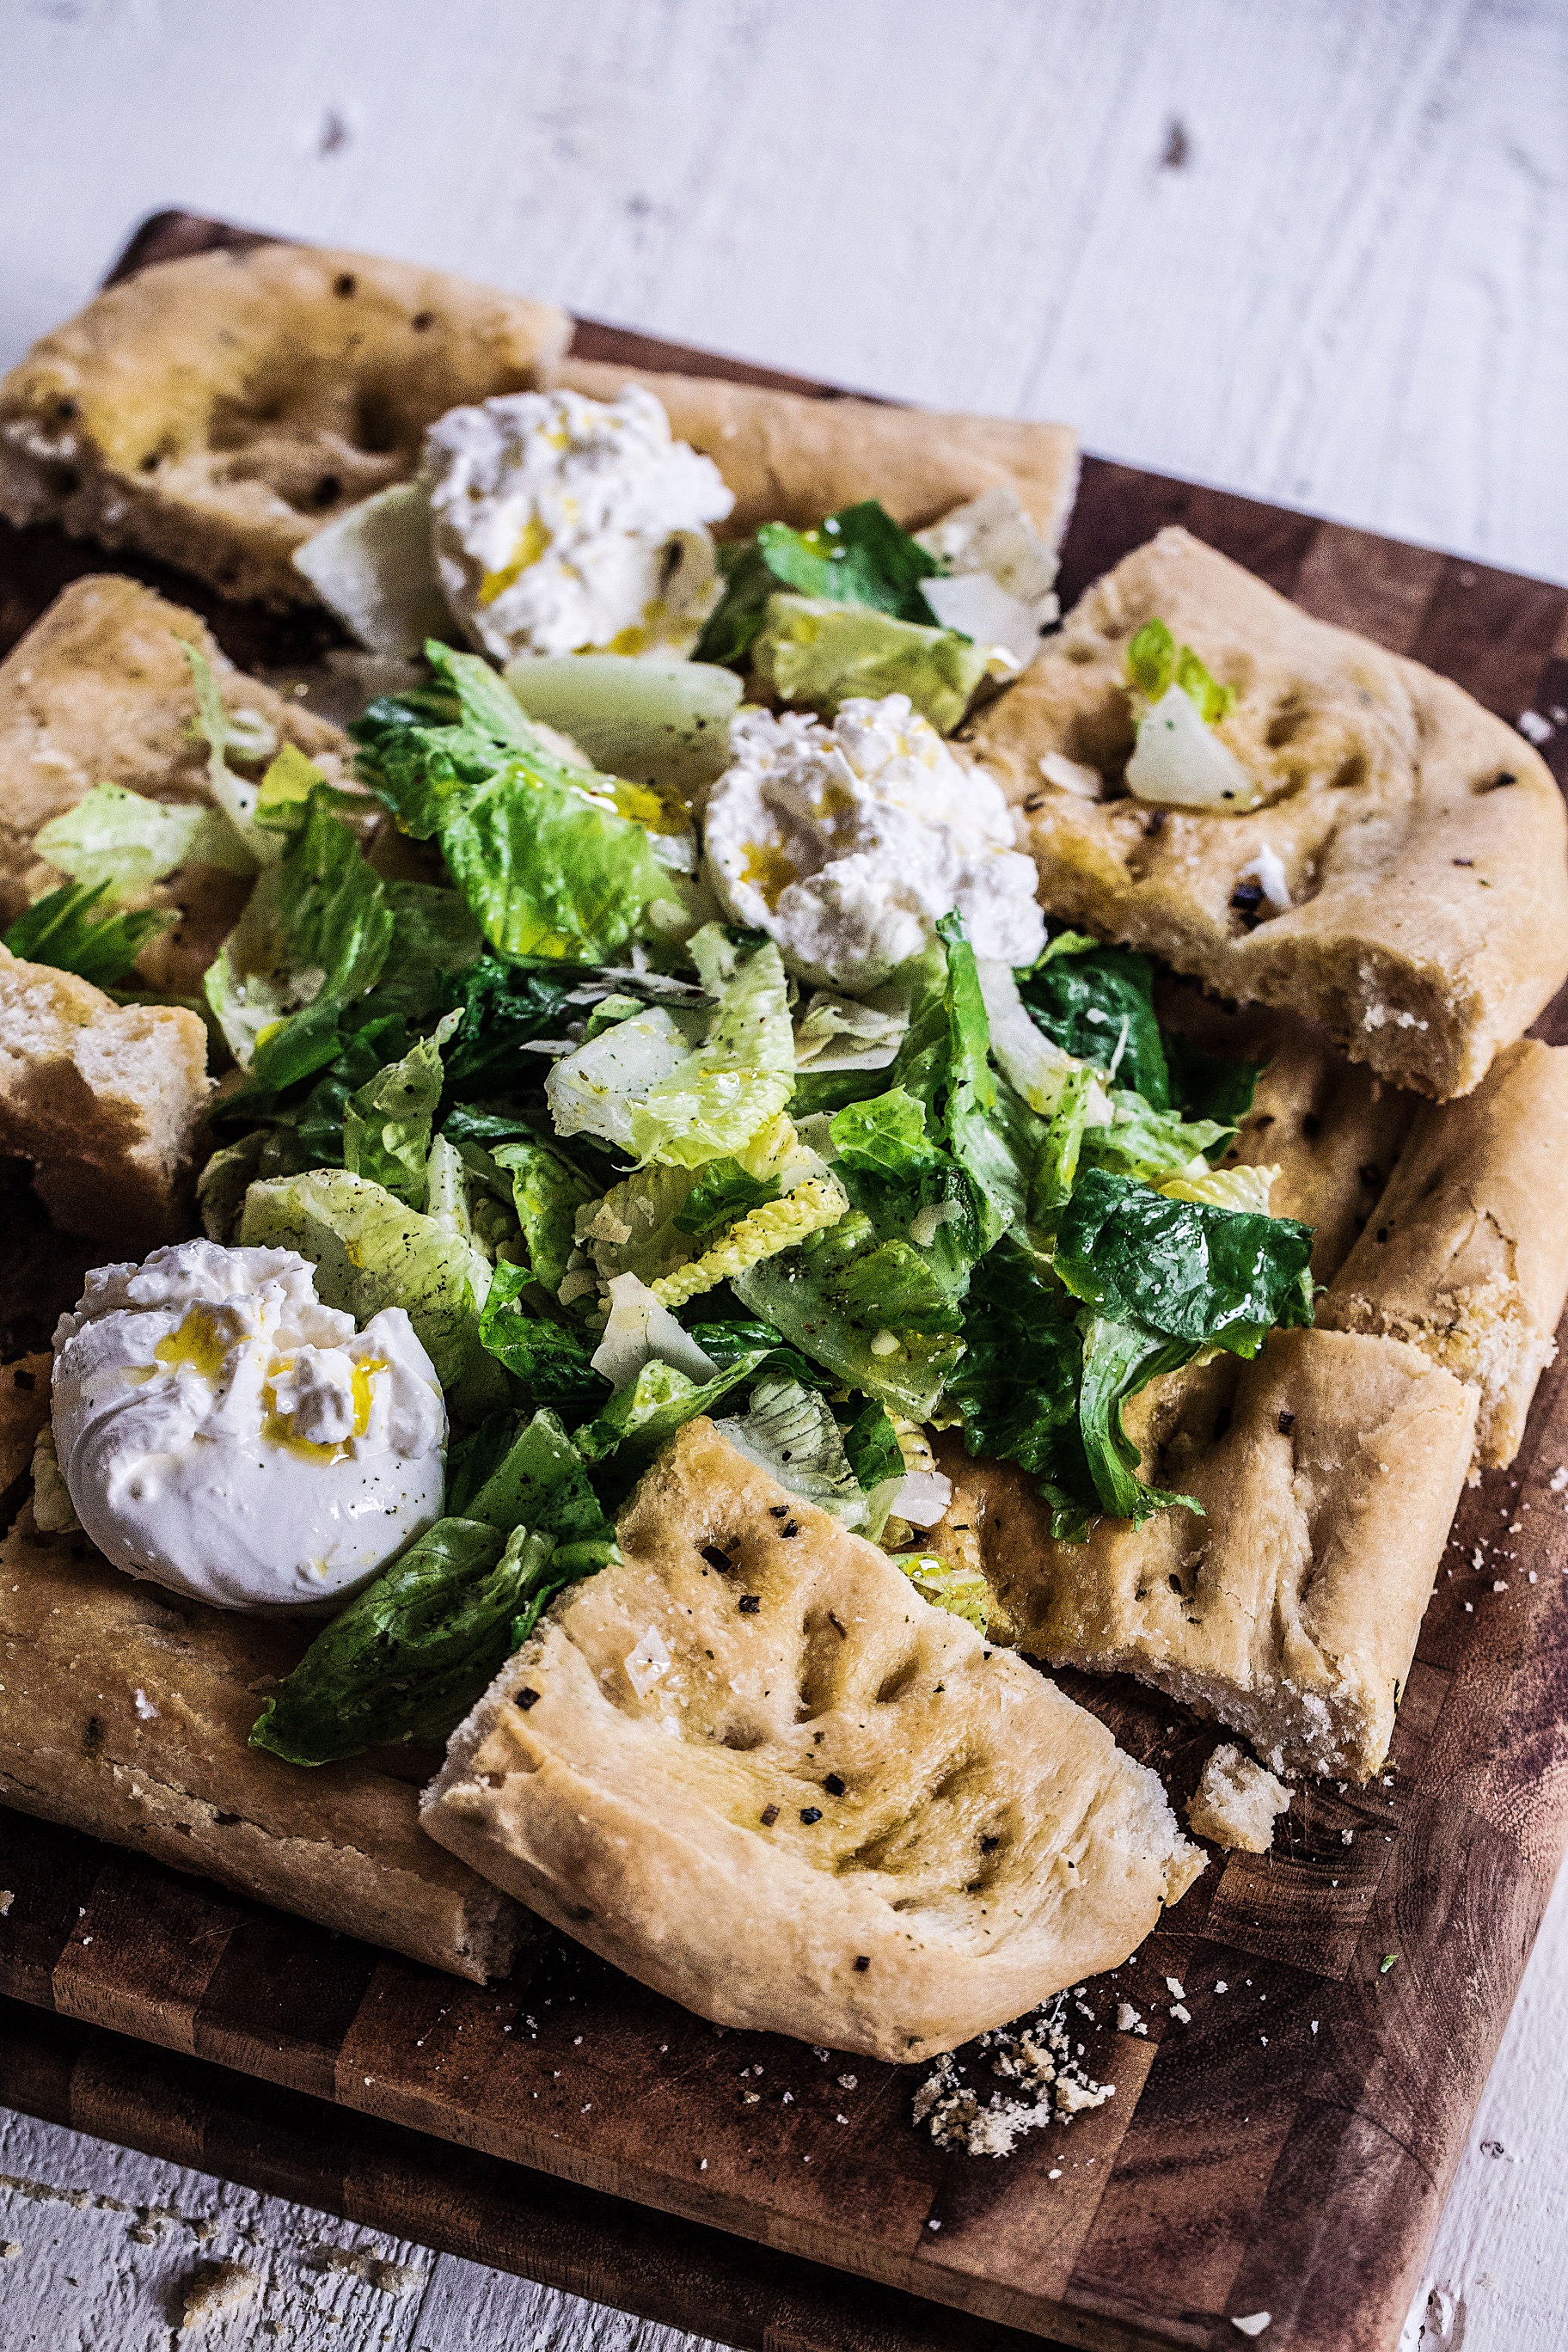
Today’s Caesar Salad-Topped Focaccia is an absolutely wonderful way to enjoy two classic Italian dishes, all in one bite. Making homemade focaccia is so satisfying, on a number of levels. For starters, you’re making homemade bread, so there’s that. That’s never not going to make you feel like you’re winning in life.
Also, there is just something so intrinsically fantastic about kneading dough – it is a cooking task that so clearly displays how hands-on you’re being with your food. You’re a creator, a maker of real food … as real as real can be. With your own two hands, one fold after another, you’re creating something from nothing, and I’ve always thought that simple homemade bread baking was a great way to really tap into this specific joy and satisfaction that home cooking can bring. Read on to learn a little more about focaccia making, or simply jump ahead to the recipe.

In my post today, I’m happy to share this Caesar salad-Topped Focaccia recipe (literally, fresh and fluffy homemade focaccia with Caesar salad piled on top) along with some of my greatest, most helpful tips for the best homemade focaccia possible. We’ll talk storing and freezing focaccia, ingredient know-how, and even – if you’ll indulge the tiny food historian that lives inside my brain – a little bit about the origins and variations of focaccia.
So, If you’ve ever found yourself intrigued by homemade bread making, wondering how to make focaccia at home, in your very own kitchen little, then you have come to the right place. We’re dishing up the need-to-knows today. We’re deep-diving into Focaccia Making 101.
From the best type of flour and olive oil to use to the pan and ideal temperature, we’re getting into it today. I’m hoping that by reading this post and giving this recipe a go, you’ll see just how simple this type of bread making can be, and you’ll gain a solid sense of confidence in the process.

INGREDIENT SPOTLIGHT: HOMEMADE FOCACCIA
Focaccia (FO-KAH-CHEE-AH) is an Italian yeasted flatbread (not unlike pizza dough) built on flour and a good amount of gold, fruity olive oil. Fortified with herbs for extra flavor, focaccia is a popular menu item at Italian and Italian-ish restaurants the world over. But honestly, its incredibly simple to make, so there’s no good reason why we should’t be making it at home, as well.
So, I mentioned a second ago that focaccia dough isn’t unlike pizza dough, but the truth is, its origins actually pre-date pizza and it is thought to actually have been the prototype for the very first pizzas (can you imagine such an illustrious role to play in food history? It’s kind of a big deal). The first focaccias are thought to have originated in Ancient Greece or with the Etruscans, and were believed to have been attached to Christmas and the epiphany.
Focaccia Variations
Cooked over a roaring hot fire, or placed directly on a heated tile or earthenware disk (think pizza stone), the earliest focaccia were cooked in a manner that reflects many of the worlds other beloved flatbreads (naan, pita, roti, tortillas, etc.). One of the most enjoyable steps in the focaccia-making process has got to be the surface dappling that occurs once you have laid out your finished dough in its pan. Using your finger tips, glistening with golden olive oil, you simply poke and prod and press your fingers into and all over the focaccia dough’s surface area. This create little wells – little delicious divets – that will collect extra oil as it pools and also stand as tiny basins for herbs and salt. The added texture that this dimpled effect brings is really lovely. Prior to this dappling, focaccia bakers would simply use a knife to puncture the bubbling bread and to keep it flat as it’s intended to be.
Yes. Sweet focaccia is, in fact, a thing.
Depending on which region of Italy you’re in, you are likely to encounter a variety of focaccia flavorings and types, ranging from sweet to savory. I actually didn’t realize there were sweet varieties until I started doing my research, as savory versions are more familiar here in the United States (I live in Indianapolis). Savory focaccias contain olive oil, cheeses, sometimes onion, often times garlic and usually herbs and spices, most commonly parsley, sage, rosemary and thyme. Literally. Sweet versions actually contain eggs in many cases, and flavor agents like honey, anise, cinnamon, sugar, raisins, and citrus peels.
FUN FACT! These special additions to the dough so distanced focaccia from plain ole bread that, at least in one location in Italy, it managed to escape the bread tax. So focaccia, it seems, is in a category all its own.
As is so often the case with many of the world’s core recipes (dumplings, noodles, sandwiches, soups, etc.) iterations of Italian focaccia can be found in other parts of the world, too. In Burgundy, focaccia is called foisse or fouaisse, in other areas of France you’ll see a similar product labeled “fougasse.” It is enjoyed under the name “fugazza” in Argentina, and in Spain, you’ll see it referred to as “hogaza.”

Tips for Homemade Focaccia
Our focaccia dough (okay, pretty much all focaccia doughs) really consist of just 6 ingredients that are true baking pantry staples – chances are real good that you’ve got at least most of these tucked away somewhere in your kitchen.
Here is a breakdown of the building blocks of a classic savory focaccia:
- Bread Flour: You can absolutely sub all-purpose flour for the bread flour I call for in this recipe, no problem. But in my pizza making and the focaccia baking, I always prefer the chewy texture that bread flour helps achieve. The higher protein content helps the texture in a way that is legitimately noticeable, but not required. NOTE: If using all-purpose flour, you’ll need about 1/2 cup more flour, most likely, as it doesn’t absorb as much water as the bread flour. Really, it just depends on the stickiness of the dough. This is a flexible sort of thing, so if you go a little over or under what I’ve specified – that’s okay. Have no fear!
- Yeast: Yeast, being the ultimate mood booster that it is, is what gives our bread its lift. “You deserve a raise!” It declares. The more yeast, the more raise. I tend to always go for flatbreads with a little less yeast (I did the same with my homemade restaurant-style naan) because I think you really get to taste the flavors and textures of the other ingredients a little better. In this case, I’m referring to the olive oil. The precious, glorious olive oil.
- Olive Oil – regular, not extra virgin: Alright. This is olive oil’s time to really shine. We’re going to literally use it inside the bread, under the bread, and over the bread. And, if you’re anything like me, you’ll even dip your finished bread into even MORE olive oil (with some balsamic). The oil flavors the interior of the bread and on top, it seals in moisture. Underneath the bread it helps the bottom crust to crisp up (it almost fries). That all said, I’m going to break away from popular convention here, and suggest you use regular olive oil – not extra virgin. It will be much cheaper for you (My Kitchen Little trick) and extra virgin really should only be used in applications in which heat isn’t being applied (dressings, aiolis, finishing oil, etc) – the smoke point isn’t technically quite as high. We’re baking with this oil, so sticking with the much more affordable, and higher smoke-point regular olive oil is great. But if you insist upon using extra-virgin, go right ahead!
- Sugar or Honey: Sugar is food for your yeast, which is why you almost always see some sort of sweetener involved in a bread recipe. It gives the yeast the ability to bloom and grow and be all that it can be. True-blue, hardcore pizza masters, however, will stray away from it, saying that the dough doesn’t need it. But for a home cook’s kitchen, that sugar or honey will really help get us where we need to go.
- Warm Water: When combined with water and sugar, yeast makes dough rise. Use lukewarm water to reduce the rise time (technically approx 100-110°F). Anything over 130ºF will kill your yeast.
- Salt: When baking a savory focaccia, a lot of your flavor is going to come from the salt – don’t be afraid of it! I’m certainly not. For the best results, I suggest using your favorite kosher salt. I like to sprinkle my favorite crunchy, flaky sea salt on top as a fancy finishing flourish (say that three times fast).

Ways to Serve Focaccia
In today’s recipe, we’re showcasing one of our favorite ways to serve focaccia – with a bright, fresh green salad piled to high heaven, right on top of the bread. In this case, we’re taking a little help from our store and using a pre-arranged Caesar salad kit from of grocer’s produce section. As it were, Caesar salad dressing is truthfully the one kind of store-bought dressing that I think is any good, and since we’re making our own bread here, I say go right ahead and get the pre-made salad. I nestle in some big pieces of burrata as well, for an effect that is truly mouthwatering.
- Focaccia is also great when cut into bite-sized pieces and crisped up in a pan with some extra olive oil and butter, and then used as croutons.
- Torn up into pieces, focaccia (especially day-old focaccia) is great as the bread component of a panzanella salad (Italian bread and tomato salad).
- I LOVE using fresh focaccia as sandwich bread – it’s totally luxe and will skyrocket your sandwiches into stratospheric levels of deliciousness.
Storing and Freezing Your Focaccia
You can leave your focaccia out for almost an entire day without compromising its texture or freshness – that’s one of its charms. That said, it does taste best straight from the oven (like every bread, ever).
Freezing: You can freeze focaccia dough just as you would your pizza dough. After the dough rises in the mixing bowl, punch it down to get the air out, coat it with a little olive oil, then cover or tightly wrap it, and freeze for up to about 3 months. To thaw, place your dough in the refrigerator. Once thawed, remove the dough from the refrigerator and let it rest for 30 minutes. Shape the dough on your baking sheet and proceed with the recipe.
Once prepared, you can keep your focaccia out on the counter, covered, for 2 days. However, when tightly covered/wrapped, it will keep for you in the fridge for about 5 days.
Popular Focaccia Toppings
Garlic & rosemary herb focaccia, which is what we’re sharing today, is probably the most widely made – it’s classic for sure. But the world is your focaccia-topping oyster and there are plenty of ways to dress up your dough. Here are a few of my favorites:
- Sliced tomatoes or sun-dried tomatoes (I love using sun golds in the summer time)
- Pesto of any kind
- Artichokes
- Mushrooms
- Olives
- Lemon zest
- Sliced zucchini
- Parmesan or grated pecorino romano
- Raw or caramelized onions or shallots

Here is a ready-made pin for you! Simply save it to your “Salad Ideas,” or “Fresh Bread” or “Recipes to Try” boards and you’ll be all set when the craving strikes.
PrintHomemade Garlic and Herb Focaccia
Soft and chewy on the inside and crunchy and salty on the outside, this homemade focaccia recipe is one I’ve been making for years, tweaking it here and there a bit. I’ve come to learn that bread flour is best, there’s no need for the higher price of extra virgin olive oil, and being a bit stingy on your yeast amount pays off in the texture department. Also, crunchy sea salt is life.
Ingredients
- 2 cups lukewarm water
- 2 tsp granulated sugar
- 2 tsp active dry yeast
- 1/2 cup plus 3 tbsp (approx.) regular olive oil, divided
- 1 TBSP kosher salt, plus extra for sprinkling/seasoning the top
- 4.5– 5 cups bread flour, plus more for hands(you can sub all-purpose, you just might need a little more)
- 3 garlic cloves, minced
- 3 to 4 TBSP chopped fresh herbs such (parsley, sage, rosemary, thyme) OR 2 TSP dried herbs
- Optional: crunchy sea salt for finishing
Instructions
1. Whisk 1 cup of the water, 2 tsp sugar, and 2 tsp yeast together in the bowl of your stand mixer fitted with a dough hook or paddle attachment. Let this bloom/rest for 5 minutes.
2. Now, add the rest of the warm water,1/4 cup of the olive oil, 1 TBSP of salt, and 1 cup bread flour. Mix on low just until the flour is no longer dry and then add 3.5 more cups flour. Mix on low for about 2 minutes. If the dough is still sticking to the sides of the bowl, add the last 1/2 cup of bread flour.
3. Transfer the dough to a lightly floured work surface. Knead the dough for a few minutes. If it’s too sticky still, just add a bit more flour until it’s workable. Flouring your hands also helps. If it bounces back when you poke it, it’s ready.
4. Clean out the bowl you used to make the dough, and lightly grease it with a little bit of oil. Put the dough in the bowl, coat all sides in a little oil. Cover the bowl with a clean kitchen towel, and let the dough to rise in a warm-ish environment for 2-3 hours or until it has doubled in size.
5. Coat a baking sheet (12” X 17”) with some olive oil; 2 to 3 TBSP should do.
6. When the dough is ready, punch it down and put it on your pan. Stretch and push your dough until it fills the pan, being careful not to rip it. If it’s hard to work or seems to be pulling back on you, allow the glutens to rest by covering it and leaving it alone for 10 minutes before working it again.
7. Cover the dough tightly and let it rest in the refrigerator for at least 1 hour and up to 24 hours. The longer it sits, the better it gets – up to 12 hours is great.
8. When you’re ready to bake it, take the dough out of the fridge and, keeping it covered, let it come up to room temp.
9. Preheat your oven to oven to 425°F.
10.Whisk the remaining 1/4 cup of olive oil with the minced garlic and herbs.
11.With the tips of your fingers, create lots of little dimples all over the surface of your dough. Drizzle the garlic oil all over the top and spread it out as evenly as you can. Sprinkle with a little extra salt.
12. Bake for 20 to 25 minutes or just until your focaccia is a light golden brown. Serve right away, or cool completely, cover and store at room temperature for two days or in your fridge for about 5 days.
Notes
NOTE:To create a warm rising environment for your dough, set your oven on its warm setting, allow it to get to temperature, and the turn it off. Place the dough inside, and keep the door slightly ajar. After about 30 minutes, close the oven door to keep the air inside.
Caesar Salad-Topped Focaccia
A fun and slightly different way to serve up your fresh, homemade focaccia – try it piled with a fresh, crunchy Caesar salad! Since we successfully made our own fresh bread, and are also using some luxe burrata here, we’re taking some help from the store and going for a pre-mixed salad – they’re quick, easy, and usually very good. But of course, you should use whatever Caesar you like. The bright, lemony flavors and crunchy of the Romaine are wonderful with the toasty, herby notes of the warm bread. Plus, we tuck some torn pieces of burrata into the mix, for a dining experience that really feels quite special.
Ingredients
- 1 recipe homemade focaccia (see above)
- 1 bag store-bought Ceasar Salad kit (such as Dole)
- 8 ounces burrata cheese
Instructions
- Prepare the salad according to package directions, using the various elements contained within the package as needed (I often set aside the croutons and snack on them another time).
- Pile your prepared salad on top of the focaccia and tuck some torn pieces of burrata into the mix. Serve right away.


